The Science of Candy

Introduction
Candy is for more than snacking! Explore ways to use candy to learn more about science and the world around you. Our sweet ideas include:
- blowing up a balloon without air
- testing the acid content of candy
- chromatography
- making a cake-and-candy model of an animal cell
Supplies
- 2 bottles of soda (any will work; use 16- or 20-ounce bottles)
- 1 package Pop Rocks candy
- 2 tablespoons of baking soda
- Funnel
- A piece of string or yarn
- 2 balloons (9-inch balloons work well)
- Fruit-flavored or sour candy, such as Lemonheads, Nerds, WarHeads, or sour gummy candy. You can also try Skittles, SweetTarts, Starburst, or Pixy Stix.
- Baking soda
- Water
- Cup, bowl, or measuring cup
- Water
- Coffee filter, white napkin, or white paper towel
- Candy that has been dyed (M&Ms, Skittles, or Reese’s Pieces work well)
- Hard, flat surface (plate, cutting board, cookie sheet, etc.)
- Pencil
- Frosted cake
- Assorted candies
Blowing Up a Balloon without Air!
Although we typically think of blowing up a balloon with our breath (or a helium pump), here are two ways to make a balloon expand without using your breath or a pump.
Materials
- 2 bottles of soda (any will work; use 16- or 20-ounce bottles)
- 1 package Pop Rocks candy
- 2 tablespoons of baking soda
- Funnel
- A piece of string or yarn
- 2 balloons (9-inch balloons work well)
Directions
- Using the funnel, fill an uninflated balloon with a package of Pop Rocks.
- Stretch the opening of the balloon over the mouth of a bottle of soda.
- Dump the contents of the balloon into the soda.
- Use a piece of string or yarn to measure the expansion of the balloon.
Notes
Pop Rocks start out like any other candy — sugar that is heated up. What they do differently to Pop Rocks is add a lot of carbon dioxide to the heated mixture under high pressure. When you crush or dissolve the Pop Rocks (in your mouth, by grinding, or by dissolving in soda or water), you release the carbon dioxide (that’s what makes the popping sound in your mouth).
When you mix Pop Rocks with soda, the carbon dioxide in both the soda and the Pop Rocks is released. There is actually quite a bit more carbon dioxide in the soda than in the Pop Rocks — nearly ten times as much!
- Repeat the experiment with the baking soda.
- Use string or yarn to measure the expansion of the balloon. Does it expand more or less with the baking soda than the Pop Rocks?
- What do you think would happen if you put both Pop Rocks and baking soda in the bottle?
Testing Acid Content of Candy
Sour taste is the body’s way of identifying acid, so if you taste sour candy, you can hypothesize that your candy has acid. But you don’t have to just trust your tongue! Science can prove what your tongue is telling you.
Materials
- Your fruit-flavored candies
- Baking soda
- Water
- Cup, bowl, or measuring cup
Directions
Pour a small amount of water into the cup, bowl, or measuring cup. Place the candy you are testing in the water. Only use one type of candy at a time. Now, add about a spoonful of baking soda to the candy and water and observe the change. If bubbles form, there is acid present in the candy. The greater the amount of bubbles, the greater the acid content of the candy.
Notes
Carbon dioxide gas is being produced from the acid in the candy and baking soda, producing bubbles. If you would like to conduct a simple (and yummy) science project, use the table below to record your observations.
Chromatography
Candy makers use dyes to create colorful candy. But what you see isn’t always what you are getting. You can test the true colors in candy with this simple experiment.
Materials
- Coffee filter, white napkin, or white paper towel
- Candy that has been dyed (M&Ms, Skittles, or Reese’s Pieces work well)
- Hard, flat surface (plate, cutting board, cookie sheet, etc.)
- Pencil
Directions
- Carefully place a few drops of water on the flat surface.
- Add some candy and allow the color to dissolve.
- You may test as many colors as you like, but be sure to only use one color of candy in each water puddle.
- Dip the edge of the coffee filter (or paper towel or napkin) into the colored water. It works best if you fold the paper so that you can dip an inch or so from the edge.
- Record which color you are testing on each piece of paper.
- It is very important that you follow these directions carefully: Place the paper in the cup with the edge of the paper touching the water and the colored area above it.
- Fold the top of the paper over the edge of the glass to keep it in place, or clip it to the edge with a clothespin.
- The water will rise through the paper, and when it reaches the colored dot, the dye within the candy will separate so that you can observe which colors were in the candy.
Notes
As the water travels through the paper, it will separate the different colors of dye. Some colors contain more colors than others. You may repeat this experiment with marker or even juice!
Floating Letters
Materials
- Glass of water (warm water sometimes works better than cold)
- M&Ms or Skittles
Directions
- Drop the candy into the water, being careful to keep the letter side upright. Do not stir the water at all.
- After a few minutes, observe the top of the water. Do you see any letters floating?
- Be sure to use at eight candies to make sure you get some letters!
Notes
M&Ms and Skittles use an ink that doesn’t dissolve (but is safe to eat) in the letters. While the rest of the candy will dissolve in water, the letters won’t. Although some of the letters will not survive this process intact, a few should!
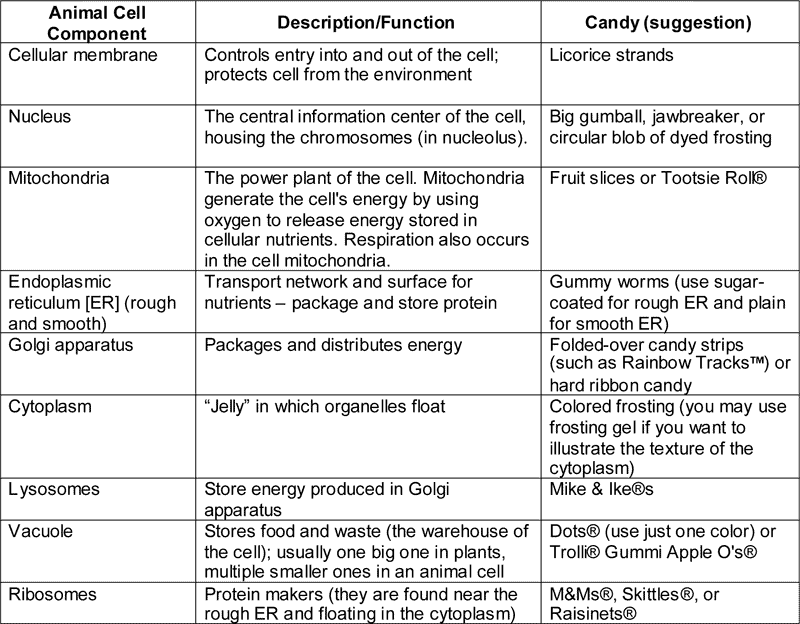
Cell Cake
Cells are made up of components called organelles (“little organs”). Plant and animal cells have different structures. You can use candy to learn about these fascinating, microscopic building blocks of life by creating a cell cake! If you are interested this topic, be sure to explore the lesson plan on the cell.
Materials
- Prepared and frosted cake (may use purchased cake)
- Assorted candies (see chart for ideas)
Directions
Using the candies, create a model of a cell on top of the cake. The candies represent the different parts of the cell. Other candies may be substituted, and not all parts of the cell need to be represented. The chart below lists some of the structures in a typical animal cell, along with a very basic explanation of the organelle’s function.
Want to learn more about cells? Check out these websites!